When a Groin Pull Stops You in Your Tracks
Groin pull stretches are one of the most searched recovery topics for athletes — and for good reason. A pulled groin can sideline you fast, whether you’re cutting on a soccer field, sprinting on a track, or pushing hard in the gym.
Here are the safest and most effective groin pull stretches recommended by physical therapists:
| Stretch | Type | When to Use |
|---|---|---|
| Butterfly stretch | Static | Early recovery, gentle phase |
| Short adductor stretch | Static | Early-to-mid recovery |
| Wall groin stretch | Static | Early recovery, low load |
| Standing groin stretch | Static/Dynamic | Mid recovery |
| Lateral lunge | Dynamic | Mid-to-late recovery |
| Leg swings | Dynamic | Warm-up, late recovery |
| Kneeling hip adductor stretch | Dynamic | Mid-to-late recovery |
When can you start? Most people can begin gentle groin stretches once the sharp, acute pain begins to settle — usually 2 to 3 days after injury. Stretching too early can make things worse.
A groin pull is an injury to the adductor muscles on the inside of your thigh. These muscles are responsible for pulling your legs together and stabilizing your hips. When they are overstretched or forced to contract suddenly — think a hard sprint or a quick change of direction — fibers tear and you feel that sharp, stabbing pain.
Groin injuries account for 2 to 5% of all sports injuries, and in soccer and hockey players, that number jumps to 10 to 11%. So if you’re dealing with one right now, you are far from alone.
The good news: with the right approach, most mild to moderate groin strains heal in 4 to 8 weeks — and smart stretching is a key part of getting there.
I’m Kevin O’Shea, Certified Strength and Conditioning Specialist at Triple F Elite Sports Training, and my background coaching athletes from high school through adult competition has given me a front-row view of how poorly-managed groin pull stretches can turn a two-week injury into a two-month setback. In this guide, I’ll walk you through exactly how to stretch and strengthen your groin safely so you can get back to full performance.
Understanding Groin Pulls and the Acute Phase
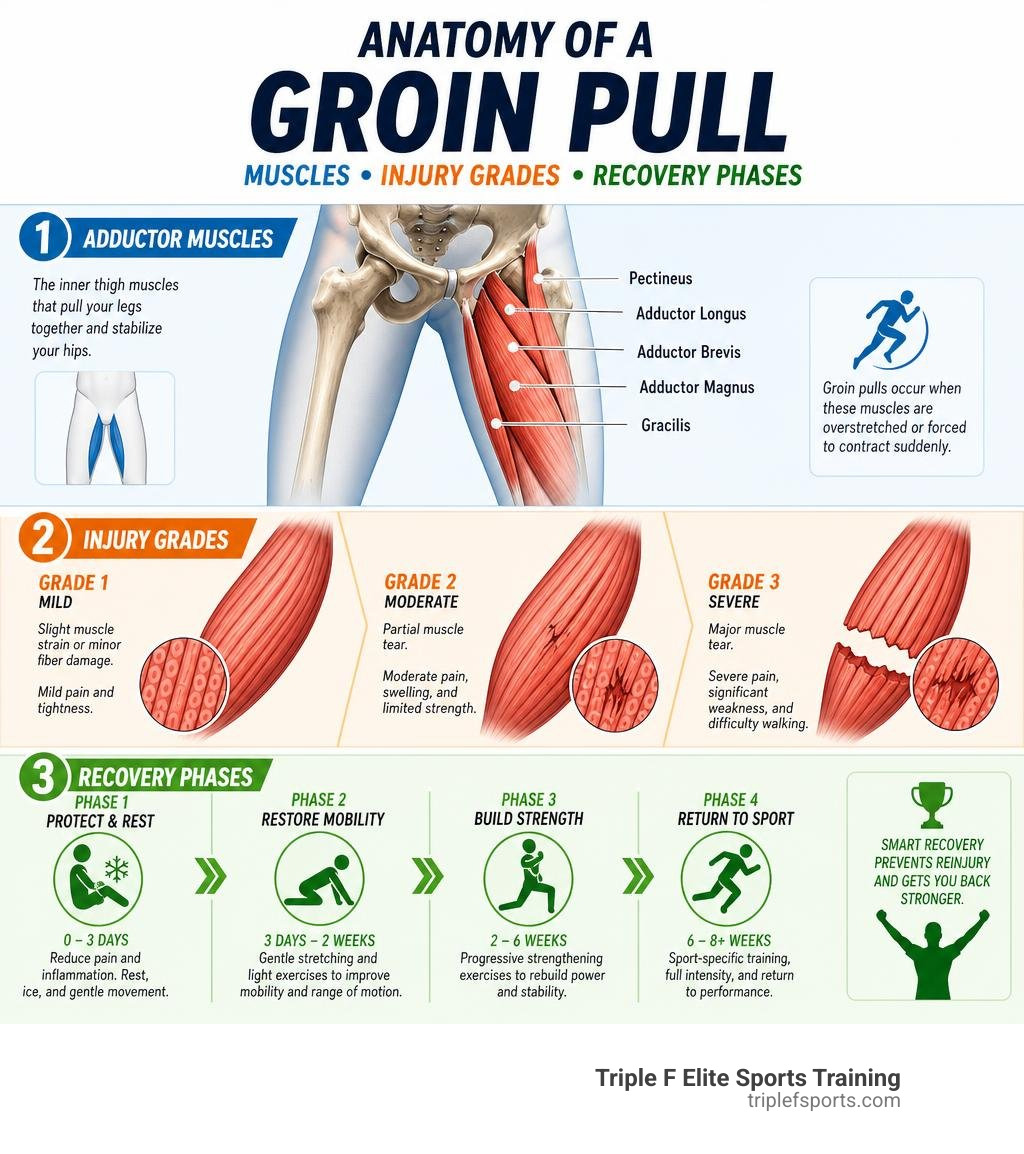
To recover efficiently, we first have to understand the anatomy of what is actually injured. The “groin” isn’t just one muscle; it is a complex network of tissues. Primarily, a groin pull involves the hip adductor muscle group, which consists of five distinct muscles located on the inside of the thigh:
- Adductor longus (the most commonly injured muscle)
- Gracilis
- Pectineus
- Adductor brevis
- Adductor magnus
These muscles attach the pelvic bone to the inner femur and knee, working in tandem with your core and hip flexors to stabilize your pelvis, rotate your upper leg, and pull your legs inward.
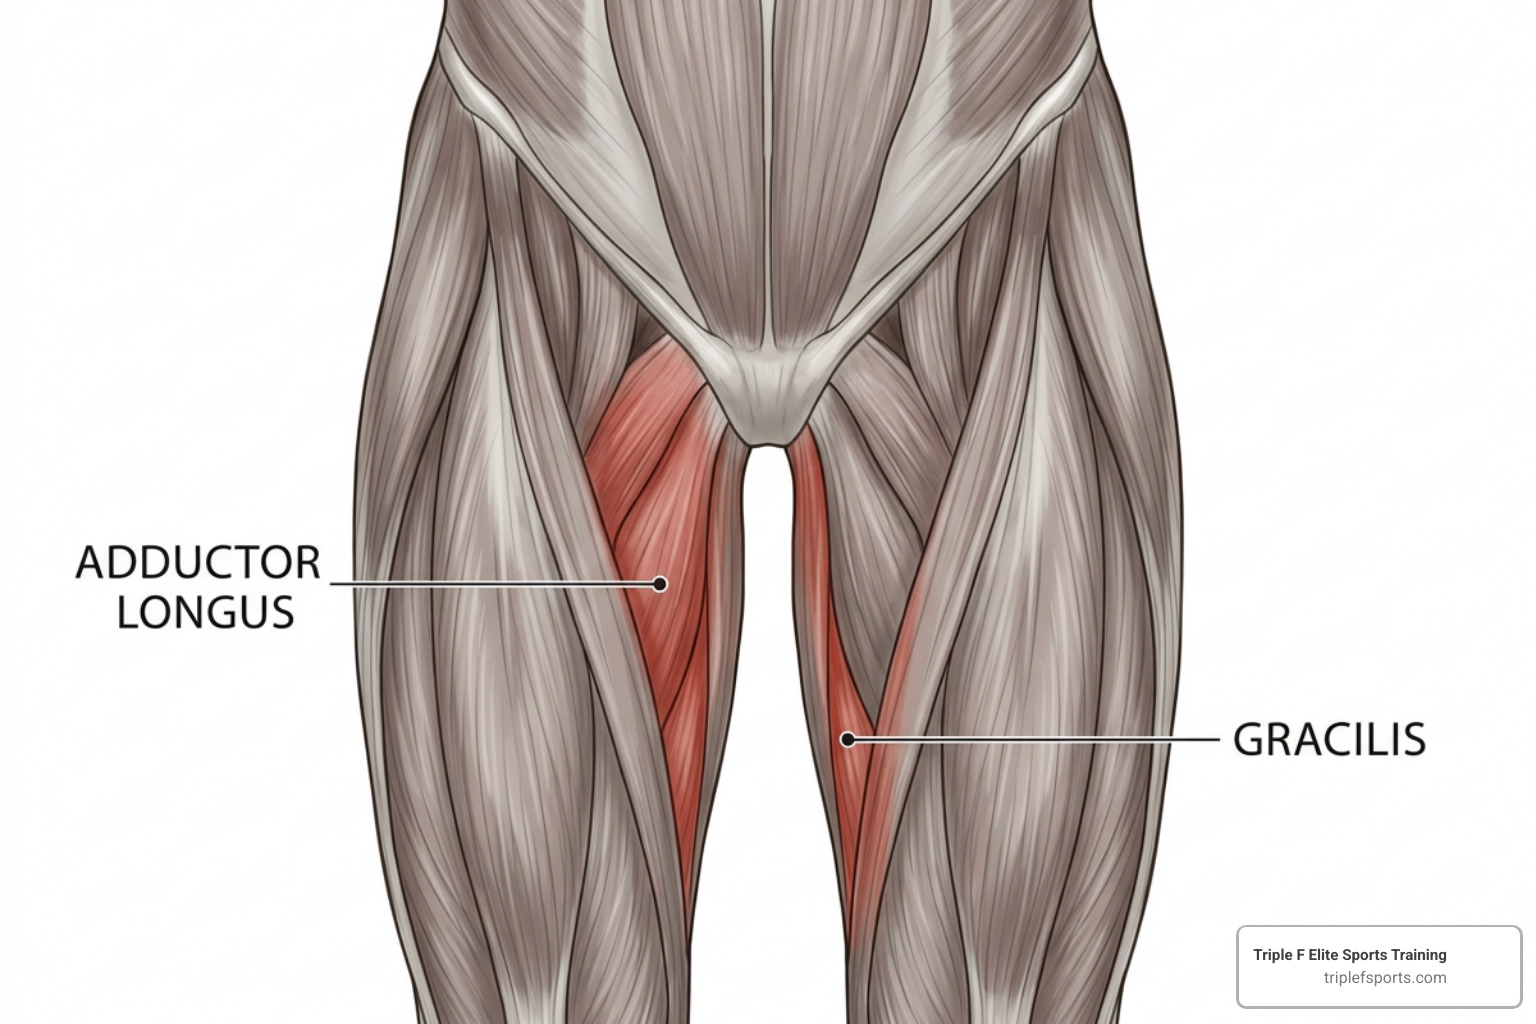
When these tissues are loaded beyond their physiological limits, a muscle strain occurs. Clinicians classify these injuries into three distinct grades:
- Grade 1 (Mild Strain): A micro-tear affecting less than 5% of the muscle fibers. You will feel mild tightness or a slight tugging sensation, but you can usually walk without a limp.
- Grade 2 (Moderate Strain): A partial tear of more than 5% of the fibers. This grade presents with persistent localized swelling, noticeable weakness, and sharp pain when walking, squeezing your legs together, or lifting your knee.
- Grade 3 (Severe/Complete Tear): A complete rupture of the muscle or tendon, often accompanied by a distinct “popping” or “snapping” sensation at the moment of injury. This results in immediate, severe pain, extensive bruising (hemorrhaging) down the inner thigh, and a complete loss of function.
The Immediate Response: The PRICE Method
During the first 48 to 72 hours following the injury, your primary goal is to manage acute inflammation and protect the healing tissue. We recommend adhering strictly to the PRICE method:
- Protect: Safeguard the injured leg from further trauma. If walking causes a limp or sharp pain, use crutches or a walker for the first 2 to 3 days.
- Rest: Avoid any physical activities that aggravate the groin. However, we advocate for relative rest rather than complete immobilization. Keep your upper body active and gently move your ankles and knees to maintain circulation.
- Ice: Apply an ice pack wrapped in a thin towel to the affected area for 15 to 20 minutes every 2 to 3 hours. Never apply ice directly to bare skin to avoid tissue damage.
- Compress: Use a medical compression wrap or supportive compression shorts around your groin and upper thigh to limit localized swelling.
- Elevate: Whenever you are resting, lie on your back and prop your hips and legs up on pillows, ideally elevating them above the level of your heart to assist lymphatic drainage.
During this acute phase, you can manage pain with over-the-counter non-steroidal anti-inflammatory drugs (NSAIDs) like ibuprofen or naproxen. However, limit their use to fewer than 10 consecutive days to prevent gastrointestinal issues and ensure they do not mask pain, which could tempt you to stretch or exercise prematurely.
Groin Pull vs. Hernia: How to Tell the Difference
Because of their anatomical proximity, a groin pull is frequently confused with an inguinal hernia. It is critical to differentiate between the two, as their treatment pathways are entirely different.
A groin pull is a muscular injury that will heal with physical therapy and progressive loading. An inguinal hernia, however, occurs when a small portion of the intestine or abdominal fat protrudes through a weak spot in the lower abdominal wall muscles.
To help determine which injury you are dealing with, you can perform a simple “coughing test” at home:
- Check for a visible or palpable lump: Stand up and gently place your fingers over your lower abdomen and pubic bone. Cough or strain slightly.
- Evaluate the sensation: If you feel a distinct, localized protrusion or bulge that enlarges or pushes outward when you cough, you are likely dealing with a hernia.
- The pain profile: Groin strains typically hurt when you actively squeeze your thighs together or stretch the inner thigh. Hernia pain is often described as a dull, heavy ache in the lower abdomen or scrotum that worsens with lifting, bending over, or coughing, but is not directly aggravated by passive leg stretching.
For a deeper dive into diagnosing adductor-related injuries, you can read more on Differentiating a groin pull from a hernia. If you suspect a hernia, consult a physician, as hernias do not heal on their own and may require surgical evaluation.
When Is It Safe to Start Groin Pull Stretches?
One of the most common mistakes athletes make is stretching a freshly pulled groin immediately. Premature stretching during the acute inflammatory phase can disrupt early tissue repair, tear newly forming collagen fibers, and significantly prolong your recovery timeline.
You should only begin performing groin pull stretches when you meet the following criteria:
- Pain-Free Walking: You can walk at a normal pace on flat ground without a limp and without experiencing any sharp pain in the inner thigh.
- No Pain at Rest: You no longer experience throbbing or sharp pain when sitting, lying down, or sleeping.
- Minimal Tenderness: Gently pressing along your inner thigh muscles does not provoke a sharp pain response.
If you meet these guidelines, you can safely transition from the PRICE protocol to active recovery. For more details on safely managing this transition, see How to perform pulled groin stretches safely.
The Best Groin Pull Stretches for Safe Rehabilitation
Rehabilitating an adductor strain requires a careful balance of static stretching (to gently restore tissue length and reduce protective muscle guarding) and dynamic mobility (to prepare the muscles for the multi-directional demands of sport and daily life).
Always warm up before stretching. Spend 5 to 10 minutes performing low-impact cardiovascular activity, such as riding a stationary bike with light resistance or walking on a treadmill. This elevates your core temperature and increases blood flow, making your muscle fibers more pliable. To learn more about how targeted physical therapy can accelerate this process, check out PT-approved groin pull stretches.
Static Groin Pull Stretches for Gentle Lengthening
Static stretches should be performed slowly and smoothly. Hold each stretch at the point of a mild, comfortable pull — never stretch into sharp or burning pain. Breathe deeply and continuously throughout each hold to help relax your nervous system.
1. The Butterfly Stretch (Seated Adductor Stretch)
This is an excellent starter stretch because it allows you to control the exact amount of tension placed on the inner thigh muscles without loading your joints.
- How to do it: Sit tall on a flat surface with your knees bent and the soles of your feet pressed together. Grasp your ankles or feet. Gently guide your knees down toward the floor using your elbows, keeping your spine straight and hinging slightly forward from your hips.
- Modification: If your groin is highly sensitive or tight, place yoga blocks or folded cushions under your knees to prevent overstretching.
- Parameters: Hold for 30 seconds. Repeat 3 times.
2. The Short Adductor Stretch
This stretch targets the upper adductor fibers near the pelvic bone.
- How to do it: Sit on the floor with your legs bent and feet together, similar to the butterfly stretch, but pull your heels as close to your groin as comfortably possible. Gently press your knees toward the floor.
- Parameters: Hold for 15 to 30 seconds. Repeat 3 times.
3. The Wall Groin Stretch (With Diaphragmatic Breathing)
Using a wall provides physical support, allowing your legs to relax into the stretch using gravity.
- How to do it: Lie on your back with your buttocks as close to a wall as comfortable. Extend your legs straight up against the wall so your body forms an “L” shape. Slowly slide your legs apart along the wall until you feel a gentle stretch in your inner thighs. Pair this movement with deep diaphragmatic breathing (inhaling deeply into your belly to relax the pelvic floor).
- Parameters: Hold for 1 to 2 minutes, allowing gravity to gently open the hips.
4. Standing Groin Stretch with a Chair
- How to do it: Stand tall next to a sturdy chair or bench. Place the foot of your uninjured leg flat on the chair. Slowly shift your weight toward the chair, bending that knee while keeping your injured leg straight and your foot flat on the floor. Hold when you feel a gentle stretch along the inner thigh of your straight leg.
- Parameters: Hold for 30 to 60 seconds. Repeat 2 to 3 times per side.
For a comprehensive look at how professional rehabilitation programs structure these progressions, explore our guide on More info about physical therapy recovery.
Dynamic Groin Pull Stretches for Active Mobility
Once you can perform static stretches without discomfort, you should introduce dynamic stretches. These movements actively move your joints through their functional range of motion, improving tissue elasticity and preparing your muscles for athletic movements.
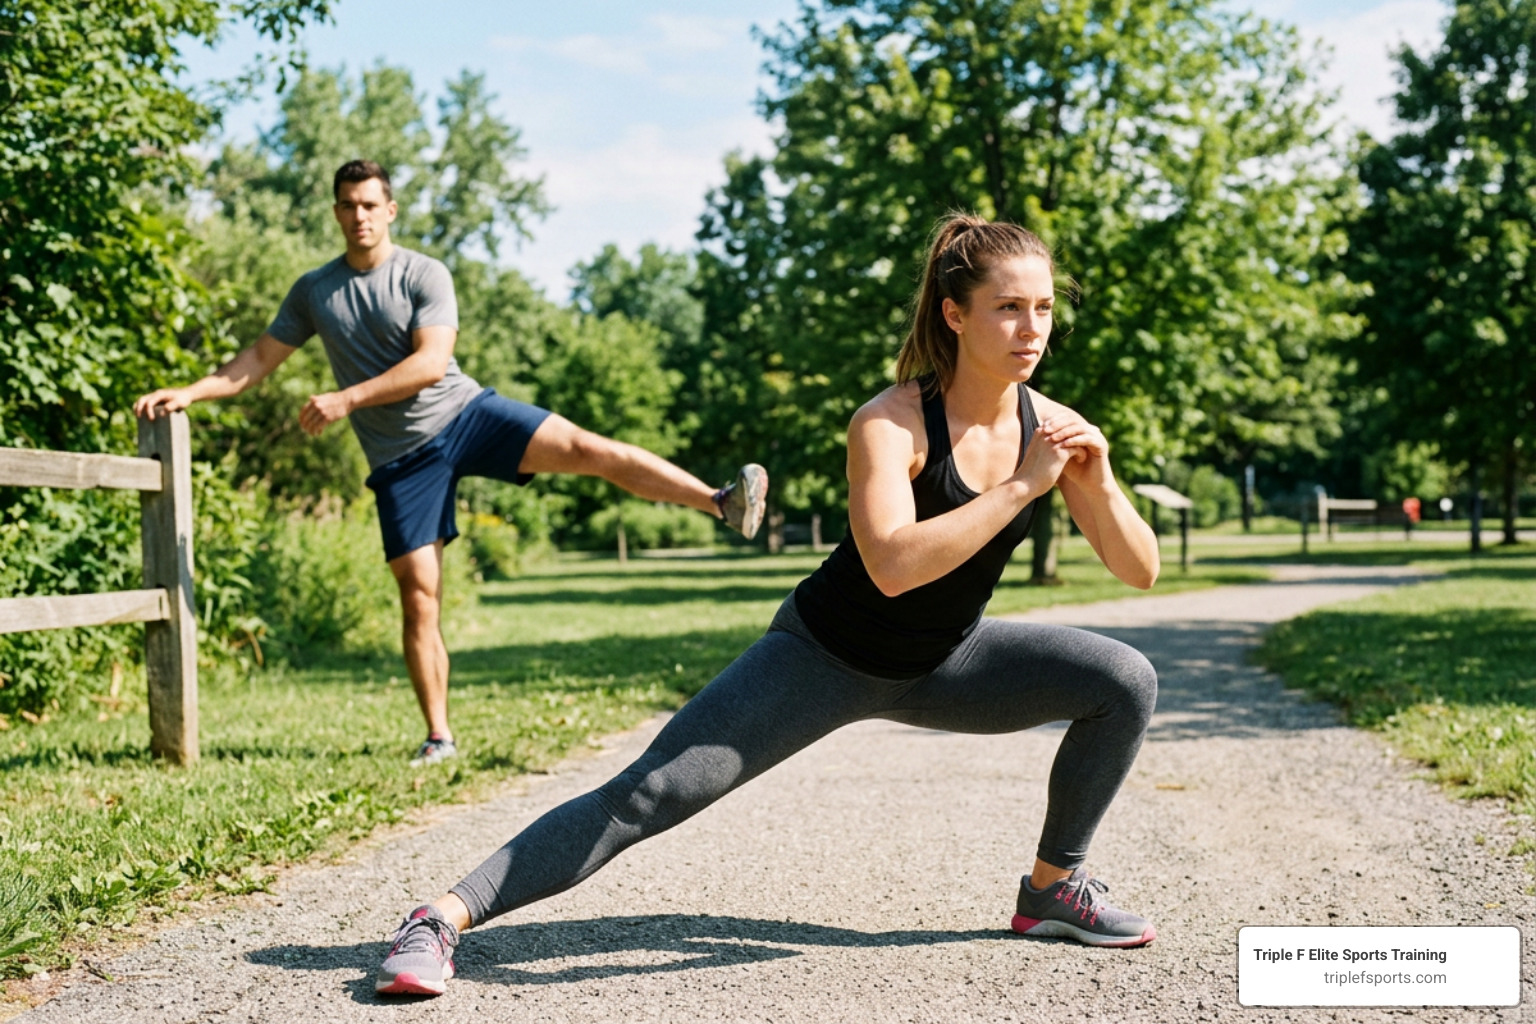
1. Leg Swings (Side-to-Side)
- How to do it: Stand facing a wall or holding onto a sturdy railing for balance. Balance on your uninjured leg. Gently swing your injured leg side-to-side across the front of your body, gradually increasing the range of motion as the muscles warm up.
- Parameters: Perform 15 to 20 gentle swings per leg. Complete 2 sets.
2. Dynamic Lateral Lunges
- How to do it: Stand with your feet wider than shoulder-width apart, toes pointing forward. Keep your chest upright and your core engaged. Slowly shift your weight to one side, bending that knee and pushing your hips back as if sitting in a chair, while keeping the opposite leg completely straight. Return to the starting position and repeat on the other side.
- Parameters: Perform 2 sets of 10 to 12 controlled repetitions per side.
3. Kneeling Hip Adductor Stretch (Rocking)
- How to do it: Begin on your hands and knees (quadruped position). Extend your injured leg straight out to the side with your foot flat on the floor and toes pointing forward. Gently rock your hips backward toward your heel until you feel a moderate stretch in the inner thigh, then rock forward to the starting position.
- Parameters: Perform 10 to 15 slow, controlled rocking repetitions. Complete 2 sets.
Complementary Strengthening Exercises and Prevention
Stretching alone is not enough to secure a full recovery. If you only stretch an injured muscle without rebuilding its strength, you leave the tissue weak, unstable, and highly susceptible to chronic re-injury.
Clinical research has shifted the recovery paradigm from passive rest to active, progressive strengthening. A systematic review published in BMC Sports Science, Medicine and Rehabilitation demonstrated that active exercise therapy yields statistically significant improvements in short-term pain reduction and recovery times compared to passive physical therapy (such as ultrasound, TENS, or massage) alone.
Active strengthening stimulates collagen synthesis, aligns new muscle fibers along their lines of stress, and restores the pelvic stability required for multi-directional movement.
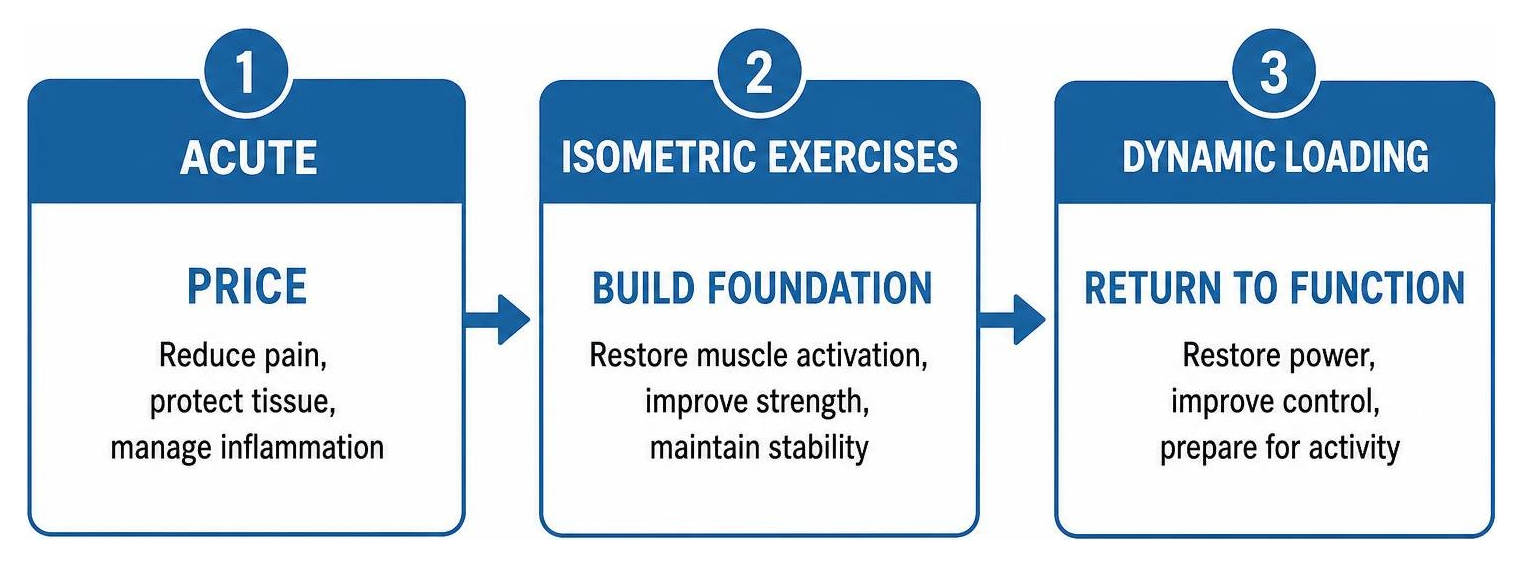
Stretching vs. Strengthening for Groin Recovery
| Phase | Focus | Primary Goal | Recommended Exercises |
|---|---|---|---|
| Phase 1: Acute | PRICE & Gentle Static Stretching | Reduce pain, protect tissue, restore basic length | Butterfly stretch, Wall groin stretch, Diaphragmatic breathing |
| Phase 2: Sub-Acute | Isometrics & Active Mobility | Initiate muscle activation without joint movement | Hook-lying adductor squeeze, Side-lying hip abduction, Glute bridges |
| Phase 3: Remodeling | Dynamic Strength & Eccentric Load | Rebuild tissue resilience, load-bearing capacity | Sumo squats, Side-lying hip adduction, Copenhagen side planks |
To understand how these concepts are integrated into a clinical setting, read More info about therapeutic exercise.
Essential Strengthening Exercises
1. Hook-Lying Adductor Squeeze (Isometric Ball Squeeze)
This exercise activates the adductor muscles isometrically, which can act as a natural pain reliever.
- How to do it: Lie on your back with your knees bent and feet flat on the floor. Place a soft exercise ball (roughly 12 to 16 inches) or a folded pillow between your knees. Gently squeeze the ball using your inner thighs, holding the contraction for 5 to 10 seconds, then slowly release.
- Parameters: Perform 2 sets of 10 to 12 repetitions daily.
2. Side-Lying Hip Abduction (Outer Hip Support)
Strengthening the outer hip muscles (abductors) is essential to stabilize the pelvis and reduce the mechanical load placed on your adductors.
- How to do it: Lie on your uninjured side with your legs straight. Slowly lift your top leg upward about 12 inches, keeping your foot parallel to the floor and your pelvis stacked. Lower the leg with control.
- Parameters: Perform 2 to 3 sets of 12 to 15 repetitions per side.
3. Glute Bridge with Adductor Squeeze
This exercise integrates glute activation, core stability, and adductor engagement.
- How to do it: Lie on your back with your knees bent, feet flat on the floor, and a ball or rolled towel squeezed between your knees. Keep your core tight and squeeze your glutes to lift your hips toward the ceiling until your body forms a straight line from your shoulders to your knees. Hold for 3 seconds, then slowly lower.
- Parameters: Perform 2 to 3 sets of 10 repetitions.
4. Side-Lying Hip Adduction
This exercise directly strengthens the adductors of the injured leg against gravity.
- How to do it: Lie on your injured side. Cross your top (uninjured) leg over and place that foot flat on the floor in front of your bottom knee. Slowly lift your bottom (injured) leg off the floor as high as comfortable (typically 6 to 8 inches), holding for 2 seconds before lowering with control.
- Parameters: Perform 2 sets of 12 to 15 repetitions per side.
For a deeper analysis of the scientific literature supporting these active rehabilitation protocols, you can review The effectiveness of active exercise therapy.
Exercises and Activities to Avoid During Recovery
To prevent setbacks and avoid developing chronic tissue irritation, you must temporarily eliminate movements that place excessive shear force on the pelvis or require explosive adductor contractions. Avoid the following activities during your recovery:
- Maximal Long-Lever Adductor Work: Exercises like deep, loaded lateral lunges or wide-stance sumo squats with heavy weights should be avoided until you have fully restored baseline strength.
- High-Volume Core Twisting: Rotational exercises (such as heavy Russian twists or woodchops) place high shear stress on the pubic symphysis, which can irritate healing adductor tendons.
- Early High-Speed Sprinting and Cutting: Sudden changes of direction, lateral shuffling, and sprinting require explosive adductor contractions and should only be reintroduced during the final stage of rehabilitation.
- Deep, Loaded Hip Flexion: Avoid deep squats or heavy leg presses, which can pinch the upper adductor tendons and hip flexors.
Ignoring these guidelines can result in compensation injuries. When your groin is weak and painful, your body naturally alters its movement patterns. This often leads to secondary issues like hip bursitis, patellofemoral knee pain, or sacroiliac (SI) joint dysfunction.
Frequently Asked Questions about Groin Strains
How long does it typically take for a groin strain to heal?
The recovery timeline depends on the severity of the strain:
- Grade 1 (Mild): Typically heals in 1 to 2 weeks with relative rest, gentle stretching, and early isometric strengthening.
- Grade 2 (Moderate): Usually requires 4 to 8 weeks of structured rehabilitation to fully restore tissue strength and range of motion.
- Grade 3 (Severe/Complete Tear): Can take 3 to 5 months or longer. Severe tears may require surgical intervention to reattach the tendon, followed by extensive physical therapy.
Is walking good for a groin pull?
Yes, walking is an excellent low-impact cardiovascular activity that promotes blood flow to healing tissues. However, it must be guided by your pain tolerance. You should only walk if you can do so without a limp and without pain. If walking causes pain, use crutches or a walker for the first few days to protect the joint, and gradually increase your walking distance as your pain subsides.
Can I stretch a pulled groin every day?
Once you have passed the acute inflammatory phase (usually 2 to 3 days post-injury) and can walk pain-free, daily stretching is safe and highly recommended. Always perform a light warm-up beforehand, stretch gently, and stop immediately if you feel any sharp or pinching pain.
Conclusion
Recovering from a groin pull requires a patient, structured approach that balances immediate protection with progressive stretching and active strengthening. By avoiding premature stretching, utilizing the PRICE method, and gradually introducing targeted movements, you can rebuild a resilient groin and prevent future injuries.
At Triple F Elite Sports Training in Knoxville, TN, we offer professional, Christ-centered athletic development and comprehensive physical therapy to help youth and adult athletes unlock their full potential. If you are recovering from a groin injury or looking to safely build your strength, we invite you to schedule your free first performance training or physical therapy session with our expert team.
For more actionable tips on injury prevention and athletic development, check out More info about preventing groin pulls. Let us help you get back in the game stronger than ever!